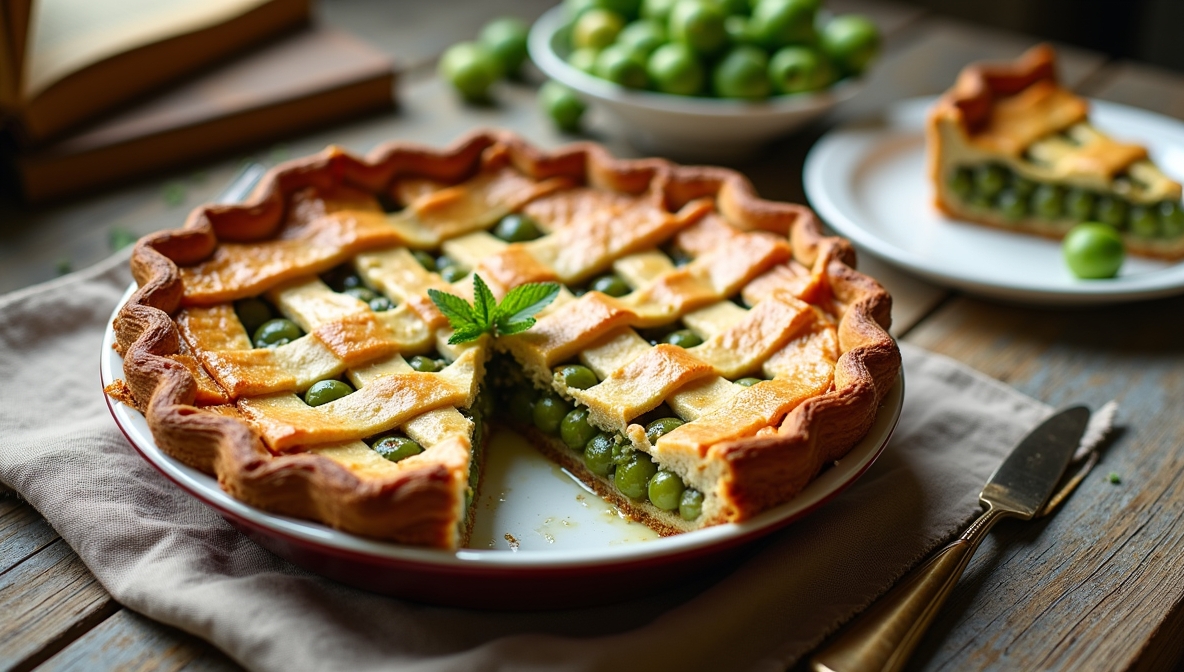
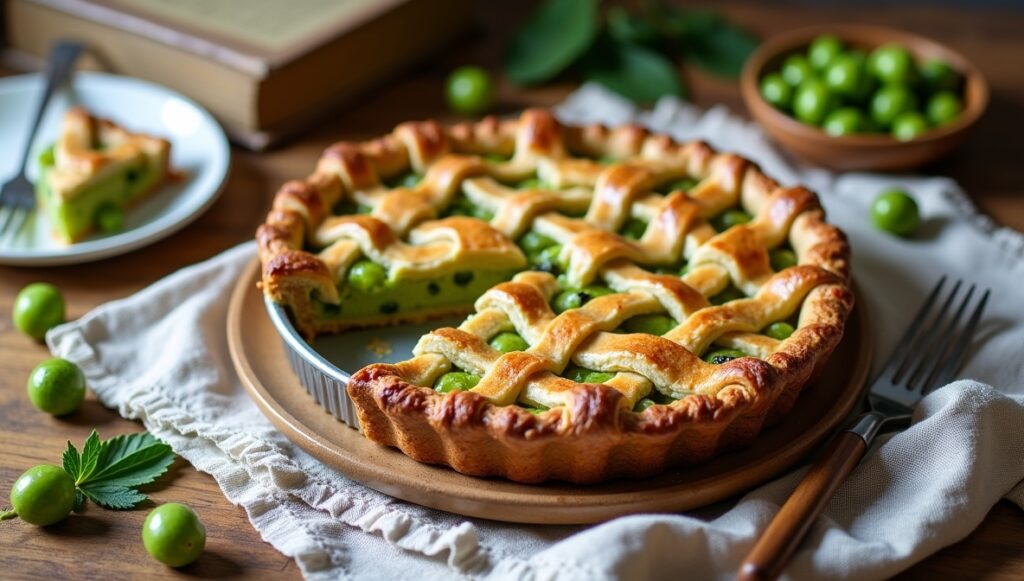
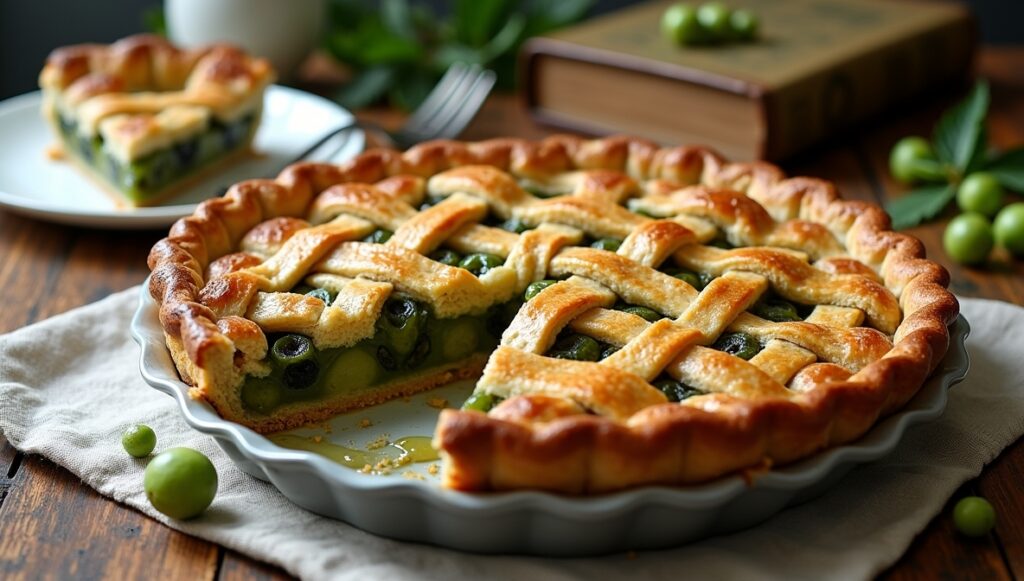
How to Bake the Perfect Gooseberry Pie at Home
Introduction: Why Gooseberry Pie Deserves a Spot in Your Kitchen
Think back to the first time you bit into a pie that was both sweet and tart, wrapped in a buttery crust that flaked at the touch of your fork. That’s the magic you’ll experience with a gooseberry pie. It’s more than a dessert—it’s a slice of tradition, a reminder of summers past, and a recipe that connects you to generations of home bakers.
When you bake gooseberry pie at home, you’re not just making something to eat. You’re creating a story for your family and friends. You’re taking a fruit that isn’t always the star of the produce aisle and transforming it into a centerpiece that people remember. Whether you grew up eating gooseberry Pie desserts or you’re discovering them for the first time, this recipe gives you everything you need to bring that nostalgic flavor into your kitchen.
What Makes Gooseberry Pie Special?
Before you start pulling out flour and butter, it helps to understand why gooseberry pie has earned its loyal following.
- Unique flavor: Gooseberries have a tart bite that can range from lip-puckering to pleasantly tangy, depending on their ripeness. This tartness is perfectly balanced when paired with sugar and warm spices.
- Versatility: While they shine in pies, gooseberries are also used in jams, chutneys, sauces, and even beverages. But nothing quite compares to the way they taste baked inside a flaky crust.
- Seasonal charm: Because gooseberries are a seasonal fruit, baking with them feels special, almost celebratory. You know you’re enjoying something that only comes around once a year.
By learning how to make a gooseberry pie, you’re tapping into a tradition that stretches across countries and centuries, from English cottages to Midwest kitchens.
Ingredients for the Perfect Gooseberry Pie
You don’t need a long list of ingredients to make this pie. What you do need is quality and attention to detail.
Here’s a quick overview:
| Ingredient | Quantity | Notes & Substitutions |
|---|---|---|
| Gooseberries | 4 cups | Fresh or frozen, trimmed tops/tails |
| Sugar | 1 ½ cups | Adjust based on tartness |
| Water | 2 Tbsp | Prevents scorching |
| Nutmeg | ¼ tsp | Optional: cinnamon, mace, or allspice |
| Flour | ¼ cup | Thickener (or half cornstarch) |
| Butter | 2 Tbsp | Dotted into filling for richness |
| Pie crust | Double batch | All-butter is best for flakiness |
Why this list works:
- Gooseberries are the star. Without trimming off their stems and tails, your pie will have an unpleasant chew. Take the time here—it’s worth it.
- Sugar doesn’t just sweeten; it balances the tartness. If you’re using red gooseberries, you might need less.
- Nutmeg gives depth, while flour or cornstarch ensures your filling holds together instead of running all over your plate.
- Butter makes everything better. A flaky, golden crust is essential for a gooseberry pie that looks as good as it tastes.
Step-by-Step Guide to Baking Gooseberry Pie
Preparing the Gooseberries
This is where patience comes in. Preparing gooseberries for a pie requires careful attention to detail, especially when it comes to trimming each berry. Every gooseberry Pie has a top and a tail, often called the stem and the blossom end, that need to be removed before cooking. While this process may seem tedious at first, it’s essential for ensuring a smooth, pleasant texture in your pie. Skipping this step can leave tough bits in your filling, which can affect the overall eating experience. Taking the time to trim each berry properly guarantees that every bite is soft, sweet, and consistent.
Believe it or not, a clean nail clipper can be a surprisingly effective tool for this task. It fits perfectly around the tiny ends of each berry, allowing for precise trimming without squashing or damaging the fruit. Using a dedicated tool like this also speeds up the process and makes it much less frustrating than trying to cut each berry with a knife. Many bakers find that once they get into a rhythm, the repetitive motion becomes almost meditative. The key is to work carefully but efficiently, keeping a steady hand to avoid removing too much of the berry itself.
If you’re using frozen gooseberries, the preparation process is slightly different but equally important. Start by thawing the berries just enough so that they’re soft to the touch but not mushy. Thawing slowly helps retain their structure and prevents them from turning into a watery pulp when cooking. Once thawed, drain any excess liquid thoroughly. Frozen gooseberries tend to release more juice than fresh ones, and leaving too much liquid in the bowl can make your pie filling too runny. Pouring the berries into a fine mesh sieve and gently pressing them with a spoon can help remove extra liquid while keeping the fruit intact.
Another helpful tip is to organize your workspace before starting. Have a clean bowl ready for the trimmed berries, a separate bowl for discarded tops and tails, and your nail clipper or scissors at hand. Working systematically not only speeds up the preparation but also keeps your kitchen clean and reduces frustration. Many bakers recommend doing this step in batches if you have a large number of berries, as it prevents mistakes and ensures that every berry is trimmed properly.
Once the berries are prepared, you’ll notice the difference in both texture and appearance when baking your pie. Properly trimmed and drained gooseberries produce a vibrant filling that holds its shape beautifully, with each berry cooking evenly. The pie will have a smooth consistency without any unwanted bits of stems or blossom ends, making every slice visually appealing and delicious. Taking the time to prepare the fruit carefully is a small investment that pays off with a superior pie.
In conclusion, preparing gooseberries for pie may require patience, but the result is well worth the effort. Trimming each berry, using a nail clipper for precision, thawing frozen berries properly, and draining excess liquid all contribute to a perfect filling. By giving attention to these steps, you ensure a pie that is not only visually appealing but also has a consistent, delightful texture. Careful preparation transforms humble gooseberries into a dessert worthy of praise, making every slice a sweet reward for your diligence in the kitchen.
Making the All-Butter Pie Crust
You can’t have a perfect gooseberry pie without a solid crust.
- Use cold butter and ice water—this is what creates flakiness.
- Don’t overwork the dough. Mix just until it comes together.
- Chill the dough before rolling. This prevents shrinking in the oven.
If you’re short on time, you can use store-bought crust, but an all-butter homemade version really elevates the pie.
Cooking the Filling
Start by simmering gooseberries with just a splash of water in a medium saucepan. The water is essential to prevent the berries from sticking to the pan and burning, but you don’t need much—just enough to create gentle steam as the berries cook. As the gooseberries heat up, you’ll notice their skins beginning to burst, releasing a bright, tangy juice that fills the kitchen with a fresh, fruity aroma. This initial cooking step is crucial, as it softens the berries and begins to develop the rich flavor that will make your pie filling irresistible. Keep an eye on them and stir occasionally to ensure even cooking.
Once the skins have burst and the berries have softened, it’s time to sweeten and season the mixture. Stir in your sugar, a pinch of nutmeg, and the flour. The sugar balances the natural tartness of the gooseberries, while the nutmeg adds a subtle warmth and depth of flavor. The flour acts as a thickening agent, helping your filling set properly once baked. Mixing these ingredients in at this stage allows the flavors to meld and the filling to reach a smooth, cohesive consistency. Be sure to stir continuously to prevent lumps and ensure that the flour is fully incorporated.
After combining the ingredients, let the mixture come to a gentle boil over medium heat. Boiling for a short time is important because it cooks the flour, activating its thickening properties. Cook for about one minute after reaching a boil, stirring constantly. This step ensures that your filling won’t be runny and will hold its shape when poured into the pie crust. You’ll notice the mixture begin to thicken slightly and the color of the berries becoming a deep, vibrant shade. The aroma will be rich and inviting, signaling that your filling is ready for the next step.
Once cooked, remove the saucepan from the heat and allow the filling to cool completely before adding it to your crust. Cooling is a critical step that is often overlooked. Adding warm filling to an unbaked or pre-baked crust can cause the bottom to become soggy, ruining the texture of your pie. Patience at this stage pays off, as a completely cooled filling ensures that your crust remains crisp and flaky. Transfer the filling to a separate bowl, spread it out evenly, and let it sit at room temperature or refrigerate briefly if needed.
During the cooling process, the flavors continue to meld, creating a balanced combination of tart and sweet with hints of spice from the nutmeg. The filling will thicken slightly as it cools, giving it the perfect consistency to spoon into your pie crust. When you’re ready, gently pour or spoon the cooled filling into your prepared crust, smoothing it out evenly. At this point, you can cover it with a top crust or lattice, depending on your recipe, and proceed with baking.
In conclusion, simmering gooseberries with a touch of water, stirring in sugar, nutmeg, and flour, and bringing the mixture to a brief boil are the foundational steps to a perfect pie filling. Taking the extra time to cook the flour properly and cool the filling ensures a smooth, set consistency and prevents a soggy crust. These steps transform simple gooseberries into a luscious, flavorful filling that makes every slice of pie a delightful experience. By following this method carefully, you’ll achieve a pie that is visually appealing, perfectly textured, and full of vibrant, tangy-sweet flavor.
Assembling and Baking
- Roll out the bottom crust and line your pie dish.
- Pour in the cooled gooseberry filling.
- Roll out the top crust and place it over the filling. You can go traditional or try a lattice for a decorative touch.
- Crimp the edges and cut a few vents to let steam escape.
- Cover the edges with foil or a pie shield to prevent over-browning.
- Bake at 375°F for 45 minutes, then remove the shield and bake 10–15 minutes more until golden.
Cooling and Serving
Here’s the hardest part: waiting. After your gooseberry pie comes out of the oven, it’s tempting to dive right in, but patience is key. The filling needs time to set properly, and cutting too soon can result in a runny, messy pie that won’t hold its shape. Even if the aroma and sight of the golden crust make it almost impossible to resist, letting the pie rest is essential for the perfect slice.
Allow your pie to cool for at least four hours at room temperature. During this time, the cooked filling thickens and the juices redistribute evenly throughout the pie. This cooling period ensures that each slice will maintain its structure, allowing you to serve clean, attractive pieces that look as good as they taste. If you try to cut the pie earlier, the filling may spill out, and you’ll lose that beautiful presentation you worked so hard to achieve.
Once the pie has cooled completely, you’ll be rewarded with perfectly set slices that hold their shape beautifully. The berries will be tender and flavorful, the filling thick and luscious, and the crust crisp and flaky. Waiting may be the hardest step, but it’s the one that ensures every slice of your gooseberry pie is a delightful, satisfying treat.
Tips and Variations for Gooseberry Pie
Your gooseberry pie doesn’t have to be one-size-fits-all. Try these variations to make it your own:
- Adjust sugar levels depending on whether your berries are green (tart) or red (sweeter).
- Add lemon zest for extra brightness, or ginger for spice.
- Experiment with mixed fruit by combining gooseberries with strawberries or raspberries.
- Upgrade the crust by brushing it with milk and sprinkling sugar on top before baking for added crunch.
- Diet-friendly swaps like gluten-free crust or vegan butter still deliver great results.
Common Mistakes to Avoid
Even experienced bakers slip up sometimes. Avoid these pitfalls:
- Skipping the trimming step leads to tough bits in your filling.
- Cutting into the pie while warm causes runny filling.
- Adding too much water creates a soggy crust.
- Forgetting to cool the filling—melts your crust before baking even begins.
Gooseberry Pie FAQs
Can you make gooseberry pie with frozen berries?
Yes, you can absolutely use frozen gooseberries for your pie. The first step is to thaw them slightly. Avoid letting them become too soft or mushy—just enough so that they’re pliable and easy to work with. Slight thawing helps the berries maintain their shape during cooking and ensures that they release just the right amount of juice, which is important for a well-set pie filling.
Once thawed, it’s important to drain any excess liquid from the berries. Frozen Gooseberry Pie tend to release more juice than fresh ones, and leaving too much liquid in the bowl can make your pie filling runny. Pour the berries into a fine-mesh sieve or colander and gently press them with a spoon to remove extra moisture. This step also helps prevent your crust from becoming soggy during baking.
After thawing and draining, you can follow your recipe as usual. The berries will behave very similarly to fresh ones when simmered with sugar, flour, and spices. By taking these small preparatory steps, you ensure that your frozen gooseberries will produce a vibrant, flavorful filling that sets beautifully and tastes just as delicious as a fresh-berry pie. Frozen berries are a convenient, reliable option when fresh gooseberries aren’t available.
How do you reduce tartness in gooseberry pie?
Increase the sugar slightly or add a sweeter fruit, such as strawberries.
Can you prepare gooseberry pie in advance?
Absolutely. Prepare the filling and crust separately, then assemble and bake when ready.
How long does gooseberry pie last?
It keeps 3–4 days in the fridge and up to 3 months in the freezer.
Conclusion: Your Perfect Gooseberry Pie Awaits
By now, you know everything you need to create a gooseberry pie that’s not only delicious but also memorable. From trimming the berries to rolling out a flaky crust, every step contributes to a dessert that’s worth the effort.
So, gather your gooseberries, roll up your sleeves, and bring this classic dessert into your kitchen. Once your pie is baked and cooled, please share it with family, friends, or neighbors. The joy of gooseberry pie isn’t just in eating it—it’s in the memories you’ll create around the table.
👉 Call-to-action: Try this recipe and share your results in the comments below. Do you prefer green or red gooseberries? Did you add a twist to the filling? Your experience could inspire someone else to make their first gooseberry pie.